| Version 24 (modified by , 6 years ago) (diff) |
|---|
Electricity
Why do I need to learn this?
Robots run on electricity. Mini-bots are small, safe, light, and uses penlight batteries, however the FRC robots you will build later this year weigh up to a couple of hundred pounds, use powerful motors, solenoids, and pneumatics, and run on batteries with enough energy to seriously hurt you. So you need to learn the basics of electricity and how to control it because:
- It's interesting and fun
- Ignorance is not bliss: so much of our modern world depends on electricity, everyone should have a basic understanding of what it is and how it works
- Safety: everyone who works on or with the FIRST robot must understand how to stay safe and keep the robot from hurting itself or others.
Objectives
By the end of the lesson you should understand:
- Electricity
- What is electricity
- The water analogy
- Volts jolt, mils kill - see what not to do with electricity here (note: this guy is an idiot and likely to get a Darwin award...DON'T DO WHAT HE DOES!)
- Units of measure:
- Volts - the pressure behind the electrons (potential energy)
- Amperes - the number of electrons flowing
- Watts = Volts x Amperes - a measure of the actual work being done
- Joules = A measure of energy = Watts-per-second
- KWh = Kilowatt-Hours (another measure of energy) = Watts-per-hour/1000
- Who's who (literally): Volta, Ampere, Watt, Joule, Ohm
- Batteries - old school vs. new school
- What is a battery
- Primary vs. secondary
- FIRST bots use sealed lead-acid batteries (1800s technology!)
- Mini-bots use primary alkaline batteries (developed 1899-1901)
- See why we are not using lithium batteries (new school)
- Good gracious...I have one of those in my pocket! Why do they use lithium batteries in cell phones and laptops if they are so volatile? For the same reason they are used in quad-copters and other applications where weight really matters: Wh/kg
- Voltage:
- Nominal voltage (alkaline=1v5/cell, SLA=2v15/cell)
- Series connected cells multiply the voltage
- Datasheets: alkaline SLA
- Current:
- Internal resistance
- What are Cold Cranking Amps anyway?
- Why it matters: motors draw a lot of current.
- Capacity:

- Amp-hours (or milli-Amp-hours)
- discharge rate matters!
- The ratings game
- specifications cheat sheet
- Energy density (SLA -> Lithium)
- Self discharge (shelf life)
- EXERCISE: Use a multimeter to measure voltage of a battery (ask a mentor if you don't have one)
- Conductors/Circuits
- What is a conductor
- EXERCISE: Use a multimeter to measure continuity
- What is a resistor
- Units of measure: Ohms
- The resistor color code chart
- How current, voltage, and resistance relate: Ohms Law
- Applications:
- limiting current (how do I stop my LED from burning up)
- voltage divider (how can I (safely) connect the 5v control signal from my Arduino to my 3v3 sensor)
- current sensing (how can I stop my motor from burning up) more advanced tutorial circuit
- Series and parallel resistance another tutorial exercises
- EXERCISE: Use a multimeter to measure resistance
- Power dissipation (or why you don't want to be a fuse)
- What is a diode
- anode, cathode: controlling the direction of current flow
- light emitting diodes aka LEDs
- Applications include indicators, proximity sensing tutorial
- LIDAR distance sensing
Experiments
 Your kit includes a variety of electronic components that you can experiment with including connecting them to your Arduino computer. The kit also includes a solderless breadboard that lets you build electronic circuits quickly and easily without having to use a soldering iron. Please read the tutorial on how to use a breadboard and jumper wires to make circuits
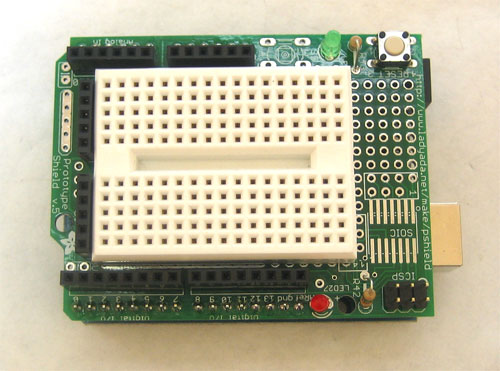
Your kit also includes an Arduino protoshield: a circuit board with pass-through connectors that you can stack onto your Arduino computer to power and control your electrical circuits. Please read the protoshield tutorial on how to use your protoshield and solderless breadboard to connect sensors and actuators to your Arduino computer.
- Connect jumper wires to +5v and Gnd connections and measure the voltage with your multimeter
- Connect +5v and Gnd through a 270-ohm series resistor and an LED to make it light up
- Blink an LED: connect a 270-ohm series resistor and an LED between an Arduino digital pin and Gnd and make it blink
- Multiple LEDs: connect a bunch of Arduino pins, resistors, and LEDs to make a festive light display
- Using a multimeter, measure the voltage across a series resistor in a circuit and calculate the current being used by the circuit.
Attachments (1)
- shock.png (56.6 KB) - added by 6 years ago.
Download all attachments as: .zip

