
Materials Needed
- For this project you will need to use the TinkerCAD software as the PIR sensor is not included in the Arduino kit that you have physically.
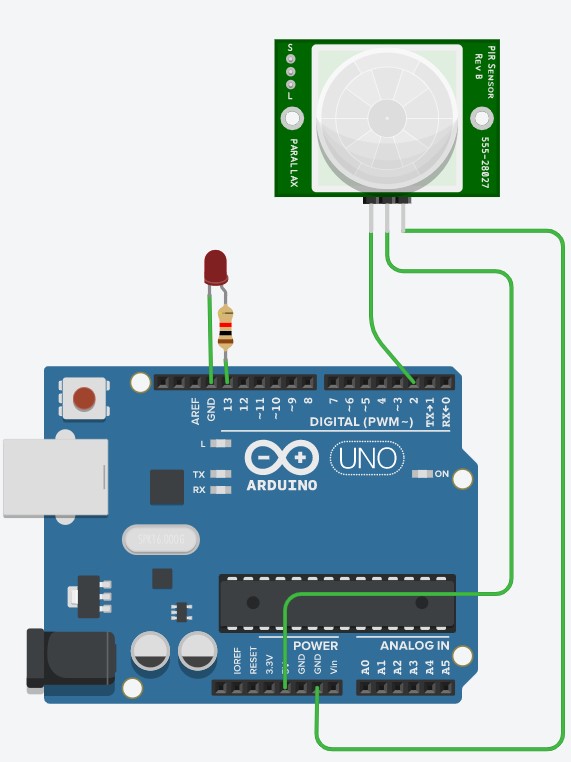
- You will need a PIR sensor, an Arduino, an LED, and a resistor.
Steps

- Let’s start with an LED, and connect the anode side of the LED to a resistor, typically with a resistance of 370 to 500 ohms.
- Connect the resistor to digital pin 13.
- Connect the cathode side of the LED to the GND of the Arduino.
- Then, take out a PIR sensor, and connect the left pin (signal pin) to digital pin 2.
- Then, connect the middle pin (power pin) to the 5v pin on the Arduino.
- Next, connect the right pin (ground pin) to the GND of the Arduino.
- Lastly, copy and paste this code into the code section with the blocks option changed to text.
- You can then run the simulation, press the PIR sensor, and move the circle around to see what happens.
Code:
const int LED1=13;
const int PIRinput=2;
void setup()
{
pinMode(LED1, OUTPUT);
pinMode(PIRinput,INPUT);
Serial.begin(9600);
}
void loop()
{
Serial.println(digitalRead(PIRinput));
if (digitalRead(PIRinput) == 1){
digitalWrite(LED1,HIGH);
}
if (digitalRead(PIRinput) == 0){
digitalWrite(LED1,LOW);
}
}
Explanation of how it works
- The LED is used to indicate when the ball (which represents an object) moves.
- The Arduino knows when to turn on the LED because of the PIR sensor that detects motion.
- The PIR sensor sends a signal through the signal pin to the Arduino, which makes the Arduino know that the PIR sensor saw something move.
- The Arduino then uses that information to turn on the LED.
- You will find that many sensors are wired in a similar fashion, with 2 pins dedicated for power (5v and GND/ground), and the other pins are used for transmitting information between the sensor and the Arduino. An example of a sensor that is wired similarly to the PIR sensor is the ultrasonic sensor, which you will get to work with during the electrical meets as a project.
Last modified 5 years ago
Last modified on Jan 9, 2021, 3:48:06 PM
Attachments (1)
- PIR Sensor Circuit.jpg (64.1 KB) - added by 5 years ago.
Download all attachments as: .zip